Beverly Hills Observatory

Astronomy from Beverly Hills, MD 21214!

  • Home
  • About
  • Contact
post

2013_07_1718

2013-07-18 By SleepIsWrong

Weather

Three clear nights in a row?  Not until it’s over do I believe it – besides, both of the previous nights included cloudy periods.  Hot today – mid to upper 90s, tonight 86-80F, humidity 65-70%, calm winds.  Seeing looks t be a bit better than 2 arscec.

As per each “clear” night recently – some clouds did move through, this time just as I was beginning the third time through the sequence of WR stars.  So I quickly moved to Beta Apr and got a couple of spectra there (one poorly focused).  Waited out the clouds (45 min?) then resumed.


Rig #1:  Spectra of WR134, 135 and 137.

Three sets – 30 min each, plus a visit to Beta Aqr.

Rig #2:  J191502+071947

100 second integrations.  With the moon moving towards full not sure how many more nights of this object, which is beginning to flirt with 17th mag.

 Focus, asymmetrical profiles

So tonight I kept every spectrum at column 180 on the guide camera.  I tried to focus before each spectrum, by maximizing the peak pixel value.  Still, the traces were badly asymmetrical.  In fact, for the Beta Aquarii spectrum I tried focusing on the “ghost” image that appears just below bright stars (internal reflection in the glass slit).  Fail!  Not surprising – but the resulting cut through the spectrum clearly showed the image was out of focus – double peak which would indicate being far enough out of focus that the shadow of the secondary mirror is visible.  After that I changed tactics and tried focusing to achieve the smallest FWHM.  That seems to work pretty well, but still the profiles are asymmetrical.

One fairly interesting thing I’ve noticed is that as things cool off I have to “raise” the mirror – to push focus back farther.  Now with just a camera the opposite is true.  Makes sense since falling temperatures causes the aluminum tube to shrink – so to keep the focus at the same place I need to move the mirror back so that the focal plane moves toward the front of the telescope, compensating for the shrinking tube.  So why is the spectrograph different?  Perhaps it’s thermal expansion and contraction is larger than the telescope’s?  Not sure what the body of the instrument is made of but I’m guessing steel.  Wonder what it’s coefficient of thermal expansion is compared to Al.

Out at 3:45am – left darks running on Rig #1.


Filed Under: Observatory Log

post

2013_07_1617

2013-07-17 By SleepIsWrong

Weather

Very warm; 85 degrees dropping to about 80 by late tonight – humidity around 70%.  Winds calm, seeing around 1.9 arcsec.  From the second WR135 image on there were short periods of clouds that passed overhead.  From about 00:45 EDST on.

Rig #1:  Spectra of WR134, 135, and 137

Same program as last night (and has been for the past six weeks!)  Get one 30-min spectrum of each star, cycle back and get another of each – total of three cycles if possible – then a spectrum of Beta Aqr at the end of the night.  Last night clouds rolled in just as I was about to acquire Beta Aqr, the rest seemed okay.

LHiRes Focus Issues

Still fighting focus issues – though not really sure it’s focus.  Basically I’m still getting asymmetrical spectral traces through images.  Here’s an example from last night – basically a cut in Y across the spectrum:

A vertical slice through a spectrum of WR135.  Note the asymmetrical shape with extended "skirt" towards lower 'y' values

A vertical slice through a spectrum of WR135. Note the asymmetrical shape with extended “skirt” towards lower ‘y’ values

I’ve not been able to figure out what is causing this – but it seems to be getting worse over the past few sessions.  I re-focused the doublet on Ne lines before sunset tonight to see if that was the problem.  I’m also moving where each object’s trace is recorded on the imaging chip tonight to see if position along the slit is the problem.  Each object will be imaged at it’s own location; in the guide camera those locations (in X) are:  WR134: x=120, WR135: x=160, wr137:x=200.  There are two things I suspect – 1) perhaps the main mirror needs adjustment, or 2) perhaps it is poor collimation?  I also notice that traces through the Ne comparison lines also show some bit of asymmetry as well – though the extended “skirt” it towards higher x values.  Even at best focus (maximum peak value for line):

Slice through a Neon calibration line (5400 angstroms, if it matters).  Note here the asymmetry is toward increasing wavelength.

Slice through a Neon calibration line (5400 angstroms, if it matters). Note here the asymmetry is toward increasing wavelength.

It does look suspiciously similar but I really have no idea if the two phenomenon are related!  Because moving the main mirror will require new flat fields I’m not likely to try that until this spell of clear nights is past.  Also note that I was able to solve this same issue late last winter during the Mintaka campaign – if I recall at the time I though it was due to something in the optical path (some black tape that had come loose from the side of the support for the main mirror).  Need to check the light path – but again that will require taking new flats so not until later this week when the clouds return.  Is it possible something loose in the Ne lamp assembly?  The power cable?  More tape?

New issue with AP1200 mount

Tonight something really scary occurred with the mount.  I was going to attempt some short-exposure spectra of Deneb, placing it at various locations along the slit to see if it made any difference in the asymmetrical spectral traces.  Since Deneb is bright I set the guide rate to a very high rate – basically 0.1-second exposures.  I’m not sure that’s what caused things to go haywire – but immediately the mount tracked very quickly north.  I stopped the guider, then tried to slew the telescope back but the mount “jumped” then froze with the yellow LED showing an overload.  Basically I was unable to slew in declination – every time I would press one of the N or S buttons the mount would run for less than a second then violently stop with the yellow light coming on.  I could slew at 64x but not 600x.  Frustrated and worried I went in to have some dinner.  When I came back out all seemed to be fine!  Tomorrow I’ll remove the declination motor assembly and see if there is anything obvious.  I only recently re-greased both the motor spur and worm gears (white lithium and Extreme Pressure Lube #3, respectively).  I’ve noticed a bit of backlash in Dec – so it might be worth a look in any event.

For the first time I’m beginning to think this mount is a lemon and maybe I should sell it.  I sure hope I’m wrong as it has worked flawlessly for the past two months!


Rig #2: J191502+071947

Same as last night – tonight using 100-second integrations.  Here’s the plot from last night:

Still exhibiting "super humps"!

Still exhibiting “super humps”!

 Meridian Flip issues

The CGE mount in dome #2 is having difficulty near the meridian.  It seems to loose it’s sense of position.  As per usual I let it run a few minutes past the meridian, then issue a slew to go to the target.  It should try to go to the target from the other side of the mount but either it just continues to try to goto with the ‘scope on the west side of the pier (no flip) or it goes completely off, pointing south and I must turn the power off to prevent it from running into the floor.  The only recovery seems to be to turn the mount off and re-boot – move to switch, use previous alignment, the goto the target.  I suspect perhaps the switches are going bad or there is still another loose connection somewhere.  More fun for tomorrow.


Filed Under: Observatory Log

post

2013_07_1516

2013-07-16 By SleepIsWrong

Weather

warm, calm, fairly humid.  Low temp ~80-85F seeing is fair to good (~2.0 arccsec) humidity around 75%.  Around 2:00am some fast-moving high clouds passed overhead.  2:45am – increasing number of thin clouds all around both targets – but still 90% clear even there.

UPDATE:  Clouded over completely before I could get the final object (Beta Aqr) for the WR stars.


Rig #1:  WR134, 135, & 137

This is about the tenth night dedicated to obtaining spectra of three WR stars for Tony Moffat.  Tonight everything is running well.  The newly-refurbished Astro-Physics 1200 mount is tracking VERY nicely!  But there is so much story behind getting that mount working.

AP1200GTO CP3 mount

The mount now used for rig #1 was purchased used of off Astromart back in February.  It was not until about April that I had assembled the additional pieces necessary to install the new mount in the observatory.  But as soon as did get things working I immediately noticed tracking and goto problems with the mount.  The problems began as soon as I tried the first polar alignment.  It appeared the mount was tracking in RA a bit too fast.  Posts to the AP Goto site were of little help as folks there tried to tell me it was because the tracking is intentionally slightly fast to compensate for refraction.  Well, I wasn’t buying it.  I noticed that the gotos were off by a fair bit too, even after getting the mount very nicely aligned using drift alignment.  The mount would also runaway and stall when set to slew at 1200x.  I began measuring how far it was off and discovered it was over-shooting every goto by about 1 part in 50 of whatever distance it had to move in RA.  That, together with the stalls, initiated a long series of emails back and forth with George and Howard at Astro-Physics.  I finally got them to let me send the RA motor assembly.  When they received it they found the motor and encoder were bad and so replaced both.  As it was not under warranty the fix cost around $475.  I received the motor assembly and re-assembled it to the mount, only to find almost the exact same problems.  Many more emails and phone calls were exchanged as the guys at AP tried to figure out what was wrong.  Finally, late in May, I decided to see if I could actually just bring the entire mount to them as I was planning to visit my dad in western Michigan.  The agreed to meet me on Thursday before Memorial Day.  I arrived at AP around noon and they checked the mount in and went to work on it.  By the time I made the trip I had carefully documented exactly everything I saw that was wrong.  The most acerbic test was timing the rotation of the worm which was 1 part in 46 too fast.  I also measured how far off the gotos were and again found them to be over-shooting by about 1 part in 50.  The AP guys (George, Howard, and Wally) took the entire afternoon working on the mount to figure out what was going on.  Ultimately it was the motor and encoder again – it appears that the new motor and encoder had the same problem as the 10-year old motor I’d previously sent them.  They’d never seen anything fail like that – but the did give me a free motor and encoder and I was on my way back to Kalamazoo, and finally back to Baltimore.  In late May I re-installed the mount, got it polar aligned, and the next possible clear night I ran through a few gotos – they were spot on!  I’d also measured the timing of the worm cycle and found that it, too, was (within my ability to measure) spot on.  The mount has worked very well since.  After doing a 15-star pointing calibration the mount has never failed to put the object I’m slewing to on the spectrograph’s small (around 3.5 arc-min) chip!  Guiding has been very good as well, typically a few tenths of an arc-second or better.

Still one problem, however

There still seems to be one problem – the mount keeps turning itself off for brief intervals, just a second or so.  I’ve tried the obvious things of making sure the power cable is making good contact with the center pin on the CP3 controller box, checked wiring connections back to the power supply, but still have not found what the problem is.

Update – August 10, 2013

The declination motor and encoder failed as well.  Clearly the electronics of this mount were on their “last legs”.  We’ll see if the new motor and encoder have any effect on the power-off episodes.

Update – July 19th, 2014

The constant turning on-and-off of the hand controller turned out to be dirty contacts inside the hand control unit.  I simply opened it up and cleaned the pins where each of the four main ribbon cables connect with rubbing alcohol and all is fine!


Rig #2:  J19150199+071747

A new CV (in Aquila?) which was bright enough that I used the V filter early in the run but is now so faint that 90-second integrations through the clear filter are only yielding S/N of around 35-40.  So my time observing this object may be nearing it’s end, especially with the moon now moving back towards fullness.  Tonight is about the seventh night of coverage for this object.

The CGE mount seems to be working fairly well right now, but a few weeks ago began having “no response 16” and “no response 17” issues.  I’m not sure it was really the problem, but opening the RA motor cover and re-seating a couple of the connectors seemed to help – no troubles since.

Problem flipping after meridian crossing

Seems like there is a problem as the did not want to flip after meridian crossing.  One thing I noticed was that the “german” box was not checked in the “telescope setup” window in MaxPoint.  I’d seen that before but had set it with a checkmark.  Looks like that does not stick – may need to check it at the beginning of the night.  Why it did not get saved?


Filed Under: Observatory Log

post

2013_02_2425

2013-02-25 By SleepIsWrong

Weather

Clear and cool – lows in the low 30s tonight.  a bit of NW wind from a cold front that just passed.

Rig#1 – new pointing model

I did a 2+4 calibration of the CGE, then did a full calibration using MaxPoint.  Since fixing the cables this mount has worked a lot better.  Tonight I was actually able to place RY Tau on the chip (albeit near the edge) on the first try.  Sadly by the time I got the pointing model finished and got ready to take data a few cumulus clouds drifted by – and by the time they were gone the object was in the tree.  I really really have to get that tree trimmed, no matter what Peggy thinks.

Rig#2 – BK Lyn

Rig #2 is back on BK Lyn.  Nice bright object for a nearly full moon, only 15 or 20 degrees away from BK Lyn.  Some clouds early on caused a number of images to be lost.

Equipment Notes

The pier top adapter plate from Dan’s arrived the other day, but appeared not to have the correct hole pattern.  I went to the post office on Saturday and sent it back to Utah.  Only to discover that what I think is needed is to purchase the Astro-Physics part 1612FSA, for which, it turns out, the plate adapter was intended to be used with.  I’m still exchanging emails with Dan Harmon but should have it straightened out one way or the other by tomorrow.

The AP dovetail saddle should arrive by Wednesday.  I still need to get the counterweight center holes bored out to 1.875 inches.  Chet at Grizzly Services thinks it will take an hour or so at $85 per to do the job, much less than a new set would cost!

 MaxIm Troubles

One of the constant frustrations with this software is it’s inability to maintain a guide star.  Even with a bright star clearly visible (with good S/N) the program is often unable to locate the star.  When auto guiding the program prints “Star Faded” and despite the star being plainly visible it just does not find it.  Sometimes just stopping the guide camera and restarting – just click stop and then track – it will find the star again and be fine.  The problem is that once it has not found the star it can completely loose it’s ability to re-find it.  Once tonight’s series of BK Lyn images was finished I tried to get a spectrum of Rowen Poole’s suspected T Tau star.  At -16 degrees declination it is going to be a challenge no matter what.  BUT, once found and centered MaxIm refused to find the star.  At one point it seemed MaxIm lost all sense of control of the cameras.  Despite asking that MaxIm perform a simple auto dark for the guide camera it just would not do so.  The only way I was able to get that back working was to shut the program down and restart.  Then it would acquire auto darks – but still would loose the clearly visible guide star.  May need to trundle on over to the MaxIm forum and see whether they’ve ever found a cure for that disease…..


Filed Under: Observatory Log

post

2013_02_2021

2013-02-25 By SleepIsWrong

Clear and cold!

Quite cold tonight, all the more painful as I spent an hour or so trying to get CGE#1 to point the telescope at RYTau.  When I finally did get there I had all matter of focus issues, re-opening an old “can ‘o worms”.  I think I need to re-set the guider mirror in the spectrograph.  The slit is nicely centered and all, but I’ve read that the mirror must also be the correct distance from the guide camera field lens.  In any event, when the object looks focused in the guider it apparently is not focused.

Rig #2:  BK Lyn

Rig #2 behaved quite nicely and I got a good sequence of images of BK Lyn.  No issues, really.

Calibration images for spectrograph

I took sequences of flat and dark images for the ST8xme#1 + LHiRes combo.  Darks were for -15C and -20C in 2×2 mode.  Next clear night I need to create a new pointing model.

PhotProc

The PhotProc program is taking shape nicely.  Currently it will find and perform aperture photometry on a stack of images, then runs Match_Stars to create the position mapping from the first image to each following image.  Then the user indicates a PSF model star using the mouse.  The program then fits a 2-d elliptical gaussian to the same star in each subsequent image and writes the parameters to a file.  Next up is to write a routine to display an image and let the user select psf, comparison, and program stars in the field.  I’m still debating as to whether to try to write a widget routine or just use a clunky mouse/keyboard entry scheme.

Filed Under: Observatory Log

post

2013_02 _920

2013-02-25 By SleepIsWrong

A surprise clear night!

I didn’t expect it to clear off tonight but it has!  It’s been raining all day – some colder weather moving in.  Got on target with Rig#2 on BK Lyn by around 8:15pm.  I may or may not fire up Rig#1 tonight – if I stay awake long enough I’ll make another pass at Rowen Poole’s suspected T Tau star.  There may be some short periods of clouds – it literally cleared just as I acquired BK Lyn.  UPDATE – as of 10:30 wind has come up a lot, from the north, looks like the cold front is passing.  UPDATE2 – clouds rolled in at around 1:15am.

Software Development

As it’s been cloudy the past few days I’ve begun in earnest to write a new aperture photometry “package” in IDL that will use optimal or variance-weighted extraction.  As of tonight the program finds all stars in a field, does aperture photometry on each star found, and, once an entire night’s data has been processed it solves for x & y shifts to map star positions in the first image onto each subsequent image.  The core programs I’m using are the IDL implementation of DAO{HOT’s FIND and APER routines, plus my own Match_Stars routine.  Tonight I had planned to start working on how I’m going to select the PSF stars which will be used to build the variance mask for each image.

Gear Update

It appears the new ST8xme camera is working very well, it’s cooler seems to be better than ST8xme#1, and read noise is slightly better.  I’ve updated the MIRA script that inserts header keywords and such (PreProc.lua) to include the three configurations for the new camera.  Truth is, that code will be moved over to IDL very soon.

I got an email from the USPS saying that the pier top plate for the AP1200 is shipping – a few weeks faster than I’d expected!  So now I need to get a dovetail saddle (ordered the DOVELM162 from Astro-Physics today) and to get some counter weights.  It appears the least expensive option I have for purchasing new weights is around $700 for 60 pounds.  So for now I’m going to see if I can use the CGE counterweights.  I called Chet at Grizzly Services and he quoted me $85 an hour to bore out the current 1.25-inch center hole to 1.875-inches.  The only question is whether the tightening screw will still be securely set enough to hold the weights to the counterweight shaft without any movement.  The only other question is whether the standard Celestron dovetail is a match to the Losmandy  “D” specification – which I always thought was the case until reading a note on the Astro-Physics website saying that, for a while anyway, Celestron’s dovetails were not matched to the “D” plate specification.  We’ll see – if not I’ll need to order a D plate from Losmandy – another $160.

Tree Limits

A little less than two hours after meridian crossing for BK Lyn.

Filed Under: Observatory Log

post

2013_02_1415

2013-02-16 By SleepIsWrong Leave a Comment

BK Lyn

Rig #2 is working BK Lyn again tonight.  The previous session I was using the Ted Agos focal reducer/adapter with the “new” ST8 camera.  Unfortunately I do not currently have another compression ring holder like the Astro-Physics one on Rig #1.  I did have one that has a 2-inch adapter with compression ring that attaches to the tail but with the Agos adapter it holds the camera a good 6 inches or so off from the back of the telescope.  Well, seeing as the camera is not well-supported in that setup it’s not surprising the images were awful, showing off-axis coma across the entire field.  Tonight I’m using the Celestron 0.63x reducer directly coupled to the telescope tail stock, along with a couple of odd adapters which hold the camera very rigidly, but not at the optimal distance.  Optimal distance from reducer to chip is supposed to be 85mm; the current setup is around 92mm.  It may be necessary to order a custom-made adapter.  It will be interesting to see how the images change across the field.  The only reason I’m using the field flattener/reducer is to get more consistent images across the entire field.  Measurements of FWHM taken in the past have shown that the FWHM varies as a function of position – by as much as 10% across the field of the ST8 chip.  The first and most important assumption about using small and identical apertures for all stars in a given field is that the PSF is the same all over.  In order to maximize S/N I generally use small (1.5xFWHM or smaller) apertures which are most severely affected by changes in the PSF as a function of location on the chip.  Time for a 14-inch Edge HD or a Meade ACF.

RY Tau

Rig #1 is taking spectra of RY Tau, using the 1200 line/mm grating.  Issues here include the difficulty focusing.  Despite getting a good focus prior to taking the first image (maximizing highest pixel value) I still get very asymmetrical line spread functions.  I keep going out and turning the focus knob CCW (pushing mirror up) and it does improve the focus, but yet to get it really on-point.  One more trip out coming up.

LHiRes Focusing

I’ve had lots of trouble getting proper focus on the guide camera on the LHiRes.  The images look very comatic – like the optics are out of collimation.  Getting an object in focus on the guide camera seems to make it out of focus for the spectrograph.  This can be seen by taking a vertical cut across a spectrum trace.  Figure 1 shows such a spectrum.

HD29646-002

Figure 1: A spectrum of HD29646. Notice how broad the spectrum trace is, and the fainter extended portion below the brightest region of the trace.

After finishing with RY Tau I decided to try to figure out what was going on.  I first tried to maximize the pixel values and minimize the FWHM as measured by MaxIm.  Doing so resulted in the image shown.  But to actually get an image so that a vertical cut through the spectrum shows a normal “symetrical” profile I need to focus inwards (focus knob turned CCW) quit a long ways.  The image as seen in the guide camera goes through a bunch of different shapes, none of them looking like a star image, mostly like what might be produced by badly aberrated optics.

verticalcut

Figure 2: A vertical trace through the spectrum shown in Figure 1. The spectrum’s line profile is clearly non-symmetrical suggesting either the spectrograph or telescope (or both) are not in focus.


The next thing I tried was to focus using the colimator lens in the LHiRes and while that worked it made the comparison lines out of focus.  So I returned the colimator so that the comparison spectrum lines were in focus and tried to collimate the C14 optics.  They were not far out of collimation to begin with, but I did center things up a bit better.  But again, imaging through the guider following collimation showed off-center secondary shadows when out of focus, and flares radiating from the images when “in” focus.

I decided to mine the posts on the Spectro-L Yahoo group and found that the cause is likely a mis-alignment of the “foldback” mirror that feeds the camera lens for the guide camera.   So I’ll be taking the spectrograph off of the telescope to more accurately adjust that mirror.  To be continued……


Filed Under: Observatory Log

post

2013_02_0607

2013-02-16 By SleepIsWrong

Well, after a really messy start it looks like the night might be productive.  I had major issues with the #1 CGE mount.  It looked like cable issues again but swapping the cables with the #2 CGE did no good and the suspect cables worked just fine on CGE#2.  I removed the RA motor cover and just looked around inside a bit and toggled the micro switches.  All seems to be fine now.  No idea what the problem was.

Rig #2 is taking 200-second integrations of CSS130106:112619+084651 (“OT1126”).  SN is around 20-25 or so but the object is low in the sky – will get better throughout the night.

This is the first night using camera ST8xme #2.  Purchased off AstroMart a week or two ago – class 1 chip and CFW9 filter wheel all for a good price.  Selling the filter wheel and filters on AMart to recoup some of the cost.

I’ve installed the 1200 line/mm grating in the LHiRes spectrograph.  If it stays clear all night I may try an object for Rowen Poole.  At declination -16 degrees it’s going to be a challenge.  The object is a suspected but unconfirmed (?) T Tau star.

Another recent purchase: a used Astro-Physics 1200GTO with CP2 electronics.  It seems to be in good shape but I won’t know just how good (or otherwise) until the pier-top mounting plate arrives, which I’ve been told will be about four weeks from now.  Currently I plan to put the new mount in the 10-foot dome and move the #1 telescope there, then mount the #2 telescope in the older dome.  The spare mount (CGE#2) might be used for parts or perhaps I’ll re-build the 8-inch f/10 and mount it on occasion.  Or maybe I’ll just sell it.  I need to get a dovetail saddle and counterweights for the 1200; as soon as finances settle down I plan to upgrade to CP3 electronics.


Filed Under: Observatory Log

post

New Spectrograph

2013-01-03 By SleepIsWrong 2 Comments

In November of 2012 I purchased a new spectrograph for the observatory from a fellow amateur and, as it turns out, long-time ProTools victim, Ron DiIulio in Texas.  It’s a LHiRes III (for Littrow High Resolution), manufactured in France by Shelyak Instruments.  Ron had purchased the instrument early in 2011 but just did not have the time to use it.  I found his ad on Astromart where he’d listed it for sale back in January.  It was quite a nice package deal as it included every grating and every slit width that Shelyak provides and so is quite versatile, offering resolution as high as 0.11 Angstroms.  Including considerations of slit width, camera pixel size, and sampling theory it should allow me to achieve a systematic maximum resolution of around 0.4 Angstroms.

The new LHiRes III attached to the tail end of the #1 Celestron 14-inch telescope.

The new LHiRes III attached to the tail end of the #1 Celestron 14-inch telescope.

Over the past month or so I’ve had the opportunity to learn a bit about the instrument and to do some calibrations and finally to baptize the new instrument with first light, that having occurred while many of my friends were either in or just off the coast of Australia for the total solar eclipse that happened on November 13th.

Calibrating the Grating Micrometer

The first thing I calibrated on the spectrograph was the micrometer that adjusts the grating angle, thus bringing different parts of the spectrum into the field of view of the acquisition camera.  Each grating will need to be similarly calibrated, but for the time being I only measured the 2400 line/mm grating – the grating which provides the highest resolution for the instrument.  I took a series of spectra of both the internal Neon calibration lamp as well as a Mercury gas discharge tube and measured the micrometer reading required to place various emission lines at the center of the ccd chip.  The figure, below, shows a plot of the results.

The wavelength range for the 2400 line/mm grating and ST8xme camera is about 175 Angstroms, at a scale of about 0.11 Angstroms per pixel.  In practice, however, I’ll likely be using a slit width that is about four times the detector’s native pixel size.  So I will usually be binning the data 2×2, resulting in a system resolution in the area of 0.4 Angstroms. Also, just looking at the plot and noting the locations of the Neon and Mercury lines it’s pretty clear that I’ll need to build or acquire an improved calibration lamp setup as wavelength calibration will be difficult or impossible anywhere blueward of about 5600 angstroms. I see that some people are using Thorium-Argon lamps, which makes sense given the wealth of bright lines across the entire spectrum, but at well over $2000 it is something that will have to wait!

Focusing the LHiRes

The next item up was to focus the instrument.  In the Littrow design the same lens is used both to collimate the light coming from the spectrograph’s slit onto the dispersing element (in this case a reflective grating) and to focus the light returning from the grating onto the acquisition camera’s CCD.  In fact, the distance from slit to collimator must be the exact same as the distance from the collimator to the imaging device.  The process of focusing the spectrograph is achieved in two steps; first the collimator is adjusted until the light coming from the slit is collimated (the rays made parallel) onto the grating, then the camera is adjusted to best focus by moving it either closer or farther from the collimator.

Focusing the Collimator

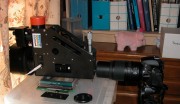
When the collimator is at the correct distance from the slit the light rays heading towards the grating are made parallel.  This is the same condition for light rays originating from an object which is at infinite distance,  So the strategy for setting the collimator position is to remove the spectrograph’s grating and in its place insert a telephoto camera lens and camera.  It is then easy to simply take exposures of light coming from the slit and adjust the collimator position until the slit is focused in the camera.  I used my Nikon D5100 DSLR along with a 300mm telephoto lens which I’d previously adjusted to focus at infinity.  The collimator lens in the LHiRes is a simple two-element achromat housed in a helical focusing device with a 1mm thread pitch; that is, a full turn of the lens in it’s focusing holder will move lens 1mm either towards or away from the slit.  The images, below, show the focusing setup and an image of the focused slit.

Setup for positioning the collimator
Fucused image of the slit

Focusing the Camera

Once the collimator lens is locked into position it is time to assure that the acquisition camera is at the proper distance from the collimator.  Shelyak Instruments makes a variety of camera adapters for this purpose and the spectrograph includes, as standard equipment, an adapter for the Santa Barbara Instrument Group ST-series cameras.  That’s plenty convenient since that’s precisely the model of camera I use.

In a perfect world that would be the end of it; simply attach the camera and away you go.  There can, however, be small manufacturing inconsistencies in both the focal length of the collimator optics and in the positioning of various components within the spectrograph itself, typically on the order of small parts of a millimeter.  The ST cameras, also, have undergone several revisions and changes.  Taken together these considerations mean that once the camera is attached it may be necessary to tweak the collimator to get the best focus onto the camera’s CCD chip.   Tests conducted by several people, most notably by French astronomer Christian Buil (one of the true pioneers in the field – his website is a treasure trove of information), have shown that measurable image degradation occurs if the collimator has to be adjusted more than about 250 microns (one quarter millimeter) from it’s optimal location relative to the slit.

Once I finally got the correct adapter attached I was relieved to find that the collimator required only very little adjustment, about 60 microns, to bring images of Neon emission lines from the internal wavelength calibration lamp into focus.  Shown below is one of the first spectra taken with the LHiRes from its new home.  It shows the absorption lines of H-alpha (Hydrogen, on the left side) and Helium (to the right).

Mintaka_1

Filed Under: Hardware and Software

post

Building the South Dome

2013-01-03 By SleepIsWrong Leave a Comment

Just after completing the first dome, in 2006, I began to purchase backup parts or “spares” for the telescope and it’s mounting. In 2007 I purchased a new Santa Barbara Instrument Group (SBIG) ST8xme camera to replace the ST9xe camera I’d been using. I decided to spring for the “class 1” chip on the ST8, and began using it in September of 2007. Not long thereafter I realized that I had an entire second setup other than another Celestron 14-inch telescope assembly. When I found one for a reasonable price on Astromart I decided to buy it and thus had two complete and nearly identical setups. Originally I figured I’d use the second rig for trips to dark-sky sites. That way I would not have to take the main telescope apart every time I wanted to observe somewhere other than my badly light polluted back yard. As it turned out, the second rig made exactly two trips to dark skies, and both times I ended up bringing both of the rigs anyway. I also began setting the second rig up on the driveway next to the existing dome. I had a “Scope Roller” contraption that allowed me to roll the entire rig out of one of the bays of my garage onto the driveway where I had painted spots indicating where the leveling bolts were to sit. It only took a few minutes to set the second rig up so I ended up using it in that fashion for about a year. In 2009 a local amateur astronomer, Norm Lewis, who was also a local TV weather man, offered his 10-foot Technical Innovators “ProDome” for sale on Astromart. The price was very attractive so I contacted him and immediately bought it. Norm helped me move the dome back to Baltimore from near Mt Airy, Maryland where he had used it for some years. Similar to the first dome I first had to break up and remove a big chunk of my concrete drive way (which had been poured twice and is over 8 inches thick). After opening the necessary space I built a 10-foot octagonal deck and then assembled the dome on that.

Platform for Dome #2

Here is the octagonal deck ready to receive the 10-foot dome. Note the central hole, through which I built a 12-inc diameter concrete pillar to anchor the mounting. Cars are going to have a tough time getting into the garage!

A freak early snowstorm slowed construction in early November, but by late November the observatory was complete. First light for the new observatory was in January of 2010. Like the first dome this dome currently houses a Celestron 14-inch Schmidt-Cassegrain telescope on a Celestron CGE go-to mount. Each of the telescopes is controlled by a laptop in their respective dome, then linked via a home wi-fi net to my main computer in the study in my house.

A shot of the South Dome during construction, just after a freak November snow storm.

The main instrument for Rig #2 is the ST9xe camera originally purchased for Rig #1. It has a 5-position automated filter wheel attached which contains a set of Custom Scientific B,V,R, and I band filters and a “clear” filter. Because the ST9 has a chip with relatively few pixels (512×512 pixel array with 20-micron pixels) it can be read out a lot more quickly than the ST8 in the adjacent dome. So I tend to use this rig for objects which are brighter and will benefit from the faster imaging cadence.


This is a shot inside dome #2 showing the #2 C14.


Filed Under: Hardware and Software

« Previous Page
Next Page »

Recent Posts

  • Orbital Period of OV Boötis
  • Calibrating the Optec TCF-s Temperature Coefficient for a Celestron C14
  • The Observatory Was Nice This Year – Look What Santa Brought!
  • Automating the LHiRes III Calibration Lamps
  • Testing the Wavelength Stability of the LHiRes III Spectrograph
  • ASAS-SN14mv
  • Total Lunar Eclipse of October 8, 2014
  • 2014_10_0405
  • 2014_09_1617
  • 2014_09_0304

Post Categories

  • Hardware and Software
  • Middle_1_Featured
  • Observatory Log
  • Results
  • Uncategorized

Archives

Site Search

You are here!

Beverly Hills Observatory > Articles by: SleepIsWrong

Organizations

  • American Assn. of Variable Star Observers
  • Center for Backyard Astrophysics
  • Society for Astronomical Sciences
  • Astro. Ring for Access to Spectroscopy
  • International Dark-Sky Assoc

Software

  • IDL
  • Mirametrics Software (MIRA)
  • Image Reduction & Analysis Facility (IRAF)
  • ISIS spectroscopy software
  • Diffraction Limited Software (Maxim DL)
  • Peranso Period Finding
  • AIP4WIN
  • MPO Canopus

Hardware

  • Astro-Physics Inc.
  • Santa Barbara Instruments Group (SBIG)
  • Shelyak Instr. LHiRes III
  • Celestron Telescopes
  • Technical Innovations Observatory Domes
  • Meade Instruments

Websites

  • Cloudy Nights Astro. Fora
  • Astromart Classifieds
  • Christian Buil’s HomePage
  • Robin Leadbetter’s HomePage
  • Kalamazoo Astronomical Society
  • Grand Rapids Amateur Astro Assn
  • Westminster (MD) Astro Soc

Copyright © 2025 by Mike Potter